Jio Phone F220B is one of the most popular feature phones in India, widely used for its affordability and reliability. However, like any electronic device, it may develop hardware issues over time. Two of the most common problems reported by users are mic failure and speaker not working. This article will guide you through the latest jumper solutions to fix these issues in 2025.
Table of Contents
Common Problems with Jio Phone F220B Mic and Speaker
Before jumping into the hardware solutions, it’s essential to understand the symptoms of mic and speaker-related problems:
🔊 Mic Problems:
- The person on the other end cannot hear your voice.
- The voice sounds distorted or very low.
- The mic works intermittently.
- Calls work only on loudspeaker mode.
🎵 Speaker Problems:
- No sound output from the speaker.
- Distorted or muffled audio.
- Works only with headphones.
- Incoming calls have no ringtone sound.
Mic Jumper Solution for Jio Phone F220B
If your Jio F220B microphone is not working, follow these steps:
Step 1: Basic Checks
- Restart the phone and check again.
- Ensure that the mic hole is not blocked by dust.
- Test using earphones; if sound works, the issue is with the internal mic.
Step 2: Hardware Inspection
- Open the back cover carefully.
- Locate the mic component on the PCB (near the charging port).
- Use a multimeter to check if the mic is receiving voltage.
Step 3: Jumper Solution
If the mic is faulty, follow these steps:
- Remove the old mic carefully using a soldering iron.
- Clean the mic area with isopropyl alcohol.
- If replacing the mic is not an option, apply a jumper wire:
- Connect the mic positive (+) pin to the nearest working mic point.
- Connect the negative (-) pin to the ground.
- Ensure the soldering is clean and reassemble the phone.
Speaker Jumper Solution for Jio Phone F220B
If the speaker has stopped working, follow these steps:
Step 1: Basic Checks
- Increase volume settings.
- Test with earphones to check if the problem is with the internal speaker.
- Ensure the speaker is not clogged with dirt.
Step 2: Hardware Inspection
- Remove the back panel and battery.
- Locate the speaker component on the PCB.
- Check for loose connections or corrosion.
Step 3: Jumper Solution
If the speaker is defective, follow these steps:
- Desolder and remove the damaged speaker.
- Clean the PCB area using flux and a brush.
- If a replacement speaker is unavailable, apply a jumper wire:
- Connect the positive (+) pin of the speaker to the nearest working contact point.
- Connect the negative (-) pin to the ground.
- Reassemble and test the device.
Mic and Speaker IC Jumper Solution
Sometimes, the issue may be due to a faulty audio IC. In such cases:
- Locate the audio IC on the motherboard.
- Check for burnt components or missing resistors.
- If needed, apply a direct jumper from the IC to the mic and speaker points.
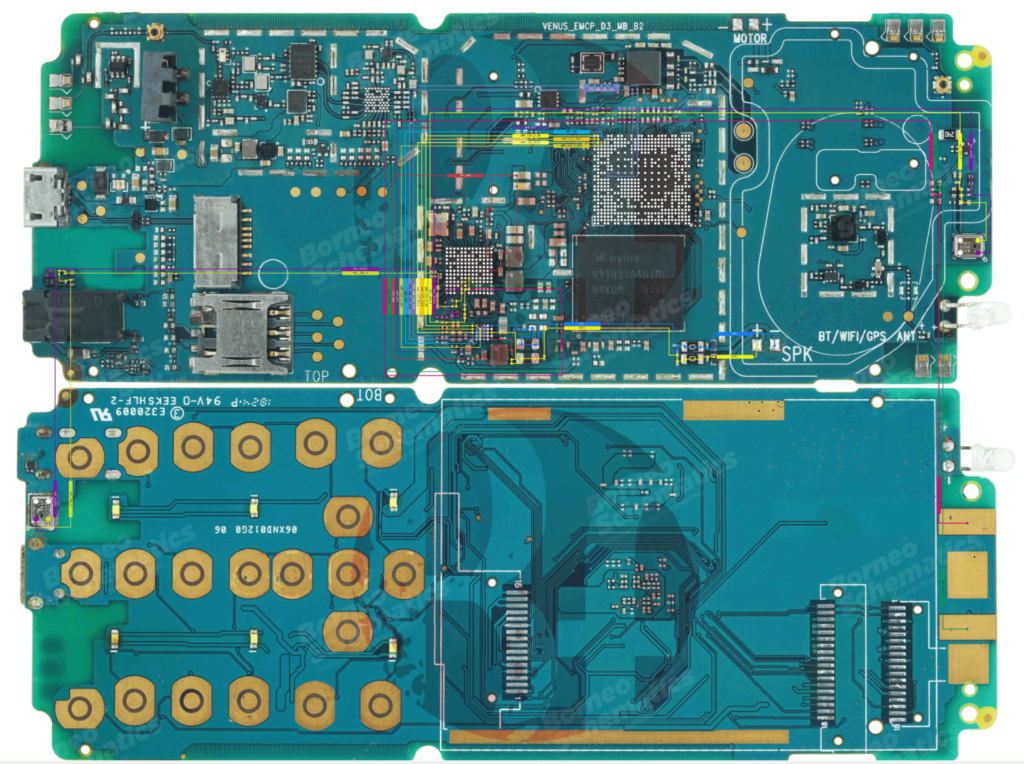
To enhance your understanding of the Jio Phone F220B mic and speaker jumper solutions, visual aids can be invaluable. Below is a detailed diagram illustrating the jumper points for both the microphone and speaker on the Jio F220B motherboard:
Explanation:
- Mic Jumper Points:
- Positive (+): Connect a jumper wire from the mic’s positive terminal to the designated point on the PCB as indicated in the diagram.
- Negative (-): Connect the mic’s negative terminal to the ground point on the PCB.
- Speaker Jumper Points:
- Positive (+): Connect a jumper wire from the speaker’s positive terminal to the specified point on the PCB.
- Negative (-): Connect the speaker’s negative terminal to the ground point on the PCB.
Important Notes:
- Precision: Ensure that the jumper wires are accurately connected to the correct points to avoid further damage.
- Insulation: Properly insulate the jumper wires to prevent short circuits.
- Testing: After completing the jumper connections, test the device thoroughly before reassembling to ensure the issue is resolved.
Final Testing
After performing the jumper solutions:
- Reassemble the phone carefully.
- Power on the device and test the mic and speaker.
- Make a call to check if the audio is clear.
- Play a ringtone or music to ensure the speaker is functioning properly.
Preventive Measures
- Avoid water damage by keeping the phone dry.
- Use a soft brush to clean the mic and speaker holes regularly.
- Handle the device carefully to prevent physical damage to internal components.
By following this guide, you can successfully repair the Jio Phone F220B mic and speaker issues with jumper solutions. If the problem persists, consult a professional technician for further assistance. 🚀